
I often get asked how I create my designs. There are various ways; creating straight from metal sheet or wire, 3D printing and carving wax and then using the lost wax casting process.
So, today I'll go through the lost wax casting process (also called investment casting).
The first piece I made using this technique was a bangle that looked like a nail. Finding a nail the right length so that I could get it cast in silver was impossible, so I needed to make one myself. I spoke to a friend about was casting as she had some experience in it and offered up her materials and tools for me to use.
Here's the finished nail bangle


The process starts with a wax model. There are different types of wax available, sheet, wire and blocks (for carving).

From left to right: Carving wax in different thicknesses, wax sheet, wax wire in different thicknesses, wax ring tube
Tools you'll need:

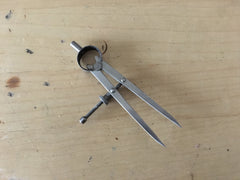
From left to right: Saw with old for cutting wax, wax pen, flex shaft with burr, file, wax ring sizer, dividers
Optional tools

From left to right: Degree gauge, scales
I'll take you though how I carved a ring. It's just a simple ring, with geometric angles on the front part and a simple rounded ring shank on the back.
Sometimes it's worth sketching your idea, but if you have something in your mind, just go for it!
Here's my sketch for my geometric ring.

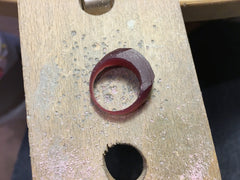
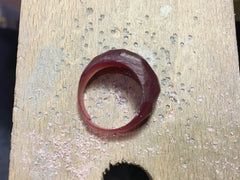
First, you'll need to take your carving block, there are specially designed ones that come with a hole in the middle designed to be used for rings, which is what I'll be using for this demonstration.
Score a circle around the block as a guide for cutting.

Cut a piece off the end using your saw and blade designed to cut through wax.

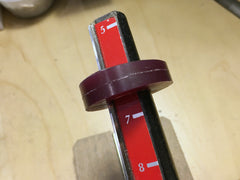
Using a ring mandrel with blade, cut the inside to make it your desired ring size. Wax reduces in size (minimally) when cast, so keep that in mind.
Start carving using a wax file making sure to file at all angles to ensure it's symmetrical (if that's the design you're aiming for). The ring shank should definitely by symmetrical.


Once you have the shank at your desired shape, start working on the front of the ring.
My shape is simple and organic, so there's room for error, it's not symmetrical so it's fairly quick and easy.
During the carving I broke the back of the shank, so I just need to fix it by melting wax and dropping it onto the part that needs to be fixed. Once cold I then carve it again so it has a seamless join.

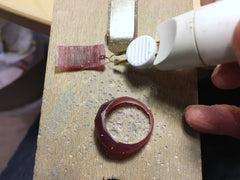

Next up we need to remove wax that won't be seen behind the front of the ring. There's two reasons for this; 1) it will cast cheaper as there's not as much wax that will be cast into metal, 2) you don't want the ring to be too heavy on your finger, it can have the look of being chunky, without the weight.

My ring is by far from perfect, but wanted to show you the process, I just did it by eye, but there are ways of making sure it's symmetrical using the scorer throughout the process.
At this point I would just take it into the casters and get it cast in sterling silver (my preferred metal to work with), but since I'm showing you the process, there's another couple of steps you can go through.
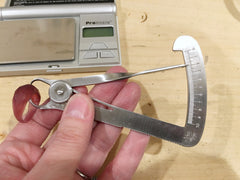
You can measure the walls of the piece with this little tool, it will show you in mm. The walls should be no thinner than 1.5mm, otherwise the piece will be too thin to cast and if it is cast, it won't be strong enough to withstand the day to day use of a piece of jewelry, especially a ring which gets knocked a lot with daily use.

You can also weigh the wax piece in grams and enter it into an online calculator that will work out how much it will cost, at market rate, to get your piece cast in the metal you choose.


Of course this doesn't take into account the casters labor costs, or the markup they use for the metal.
Next blog I'll take you through the actual casting process that I was taught a few years ago, of course larger places will have their own ways of doing it, I'll describe the way you'd do it for a smaller volume.
If you have any thoughts or questions, please let me know in the comments below! 
See you next time!

Part Two: Lost Wax Casting - At The Casters

Hi Joanne, I took a couple of PMC classes with you at JCAC- I’m looking for a good place to send some waxes for casting in sterling using the “lost wax process”. Do you have any recommendations? Best, Christi